Omphaloskepsis Blog
5 Steps To Building a Shipping Crate Like a Pro
Jul 14, 2012
The slow boat to China, crate building 101: What to do. What not to do.
You can imagine how thrilled I was to receive notice my artwork was selected for inclusion in the Beijing Biennale. I knew this was the big-time because they pay for the transportation expenses. For anyone reading this blog who is not in art, when the exhibition venue pays the shipping expenses... that's huge. Usually emerging artists pay their own way and it gets quite expensive. The instructions called for the painting to be crated with wood that is heat treated (HT) or methyl bromide treated (MB) (for pests).
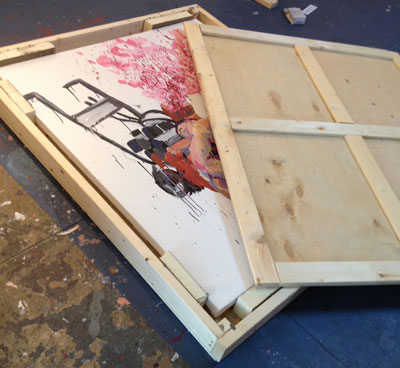
I spent quite some time at the lumber yard. As it turns out, all plywood is heat treated. It's a manufacturred product and is safe. The 2 x 4 studs I purchased, unbeknownst to me at the time, were stamped as heat treated. So I seemed to be all set!
Step 1: Get your tools and supplies together
What you'll need to build your own crate:
Drill (It's quite useful to have an extra rechargable battery)
Measuring tape
Pencil
Saw (I use my compound sliding miter saw)
Wood glue
2.5 or 3 inch star head steel screws counter sinking (often the bit comes with the screws, if not, make sure you have a bit)
3/4 inch phillips head steel counter sinking screws
4 1" or 1-1/4" phillips head screws for stabilizing bars
1 3/4 or 2 inch phillips head counter sinking steel screws
Some foam insulation (see pic)
1/4" thick plywood cut to size (I had the lumberyard cut mine, but if you're handy with a circular saw or table saw, you can do your own) UNLESS YOU'RE GOING TO CUT THIS YOURSELF, WAIT TO PURCHASE UNTIL YOUR FRAME IS BUILT.
4 2x4x8 (or the appropriate amount of 2 x 4's to accommodate your painting dimensions. If you stretch on deeper wood stretchers, you may need to go deeper than 2x4, maybe 2x6)
10 1x4x8
2 1x2x8 or 1x3x8 for the stabizing bars that will go across the back of the painting for shipping
Step 2: Build the frame around the canvas
Begin by building the the frame around the canvas.
If you typically miter your corners...not on a crate. If you look closely at this photo I have the top and bottom of the crate extending to the edges and the sides abutting to the top and bottom.
- Visible is the floor, I'm building the frame around the painting. What you don't see here is that the painting is not resting directly on the floor, it's resting on it's stabilizing bars which have already been installed for shipping.
- after I've lined up the foam on all four corners, I measure the actual size of the crate and cut the wood to the exact dimensions makeing sure that the top and bottom extend to the edges of the crate and the sides abut to the top and bottom.
- in the corners i glue a wood block. This will give me added stability and wood for my screws.
- The foam I used here was insullation foam from the hardware store. It's not as gentle as some of the other types of foam you may see in the videos I posted above. I've also glued that to the frame. I don't intend to need it as the painting will be secured to the crate by it's stabilizer bars.
- I glue the corners and then use my 2.5" or 3" star head screws to secure the corners. I use star head screws because I don't want these screws removed upon arrival. 4 top and bottom, 2 on the sides that go into the block.
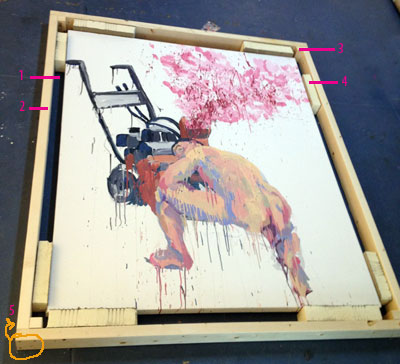
I build my own stretchers and installations, so even though I've never built a crate before, I'm no stranger to power-tools. I also took the time to watch several YouTube videos and inspect other people's crates that were hanging out in the storaga area. You can see, if you watch these videos, there are many different ways of accomplishing the same thing.
How to pack your painting for international shipping What I like about this one is his use of padding and foam.
How to build a shipping crate Never use any screws, bolts, or wingnuts that extend beyond the wood of the crate
How to build a crate for half slabs
Step 3: Build the back of the crate
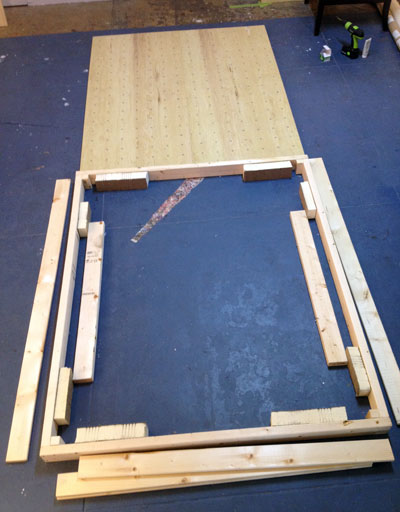
- Now that I know my exact outer crate dimensions, I can purchase my 1/4" plywood cut to size.
- (top of the photo) I use my 1x4's for the front and back of the crate. This time, for a little added stability, I make the sides long and abut the top, bottom and center bar to the sides. This way, when the whole thing is assembled, the corner joints will be althernating as they overlap.
- Take your time, be precise.
- Glue the 1x4's to the plywood, make sure the center bar is centered.
- Use the 3/4" screws from the inside of the crate to secure the 1x4's. If this were assembled at a professional crate builders, they would use a power staple gun to do this. I make sure I keep clear of the area I'm going to need to use around the edges when I flip this over and screw it onto the frame—1.5" from the edge of the back all the way around.
- Notice the two 2x4's on the inside of the frame. I'm setting up to place my painting frame face down on these. You may want to put something down on yours to protect your paint, foam or paper. I'm careful to make sure this lines up with my stretcher frame so that it doesn't put divets in the canvas. Another way to do this would be to go across the frame horizontally. I didn't want that much contact with the painting. The purpose of these 2x4's is to add counter pressure to the assembly so that I can secure the painting to the back of the crate by it's stabilizing bars.
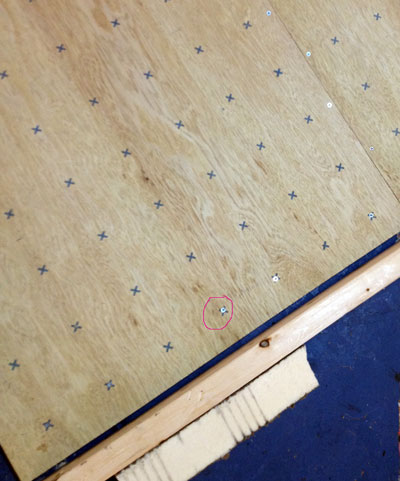
- This is a close up of how the inside of the back of the crate assembly looks with the screws. You can see my plywood has x's marked on it. That's because I bought subflooring. It became a good guide for me while I was working, although, no need to put a screw in each x around the edge.
- My back and front had two pieces of plywood each. I did notice that there was a slight edge to one side, the cut was not exact. I chose to let that slight edge extend to the top and not the bottom so that it wouldn't get knocked around or chipped.
- At this point, I still need to cut, glue and screw two vertical pieces of wood to the center of the outside (not pictured here)
Step 4: Closing the back and securing the painting
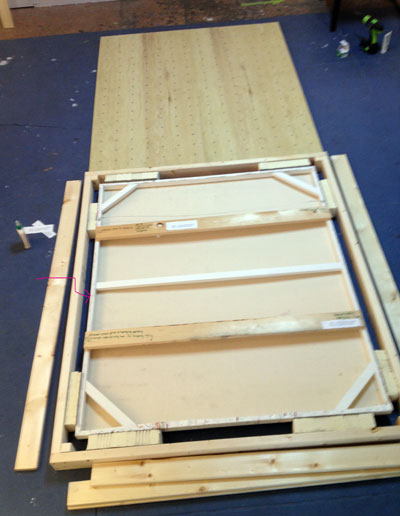
- (Above) The painting is resting on the 2x4's, face down, waiting for the back of the crate.
- Mark in pencil on the side of the crate where the center of the stabilizing bar is.
- (Below) Close up of the stabilizing bar on the back of the painting. I have put two of these on my painting. They keep the painting from torquing in transit. I cirlce the philips head screw as an indication to remove it and I write the instructions in English and Chinese (since my painting is going to China for installation) to remove the stabilizing bar prior to installation.


- Carefully slide the back over the frame and line it up. When I did this I could see I had too much counter pressure because the back was sitting above the frame. I used my extra wood to lift the frame slightly while I worked.
- Next, cut the 1x4 cross bars to align with the painting's stabilizing bars. You know where they are as marked previously on the sides of the crate. In this picture I'm using my extra wood as a straight edge to align my cross bars. I glued it down and did a couple of test screws to make sure that I went through the crossbar, plywood and into the stabilizer before securing the back.
- Glue the back of the crate as it will not be removed.
- Use 1-3/4" philips head screws to secure the paiting to the back of the crate via the stabilizer bars. Make sure your screws are not too long or they'll pierce your painting and not too short or they won't grab the stabilizer.
- Confirm that the painting is securely attached to the back.
- Use the 2.5" or 3" star head screws to secure the back of the crate to the frame.
- (below) Label the crate clearly, which end is up.
- Lable the screws to be removed by circling them and writing "remove" on the crate.
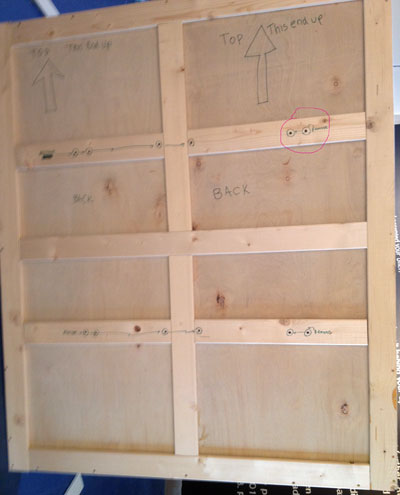
Step 5: Securing the crate

- Follow step 3 to build your front
- Carefully slide the front onto the crate. I slide mine on at a diagonal so that I don't damage the painting, then align the corners.
- Do NOT glue this side
- Use the 1.5"-2" philips head screws to secure the front of the crate.
- (Below) label the crate. Circle all the screws on the front of the crate to mark them for removal.
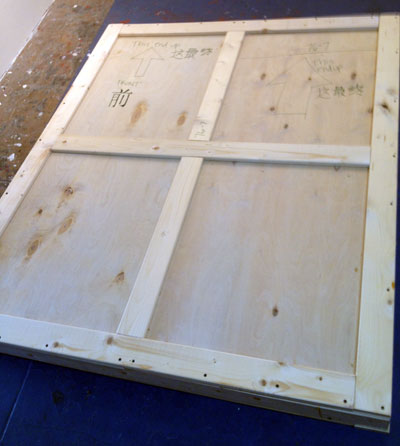
(Below) close up of my markings.

So here's my big mistake. After 3 days of crate building and completing my crate I find out—whoops!—the 1x4's I used were not heat treated. Since this was my very first crate I called in the pros, Custom Crating, to get it done right and stamp the wood so that it would clear customs in China. They came right away, inspected my crate and to my delight, gave me the thumbs up on construction. "If the art thing doesn't work out, come work for me." They took my crate back to their shop, replaced all the 1x4's and stampled the wood. Below you can see the results. The other big benefit is that the shipper can pick up directly from Custom Crating.

 MENU
MENU